Showing posts with label HTML 5. Show all posts

Tuesday, January 26, 2021

Markdown table sorting

Problem

I restarted my crypto trading recently that I put on hold back in 2018. Last time it was mainly revolving around BitCoin, Ethereum, LiteCoin only. But this time it's a new world of DeFi (Decentralized Finance) and its ETH-based coins. When I analyzed I saw that there are a lot of things affecting the price along with the sentiments and real value. I really wanted to have a place where I can list my favorite coins with my favorite properties to analyze. First I thought of creating my Wikipedia page, but I saw it's already there and outdated. I am fine with editing that page but it's locked for editing with my points in the wiki. 
The second option is to start my own crypto page in GitHub as markdown. 

Now the actual problem came. The table on the wiki page is sortable but the markdown table is not by default. The problem can be summarised as 

How to create and publish a markdown page in GitHub pages that have sortable tables 

Approach

I found many approaches but a jQuery based table sorter worked without any complications. Below are the steps to get it integrated into GitHub repo.

How it works

We can attach it to any HTML page. First, make sure jQuery is added to the page. Second, refer to the tablesorter library and its style, etc...Finally, select the tables and attach that to the table sorter.

How to integrate into GitHub pages

The GitHub pages are processed by Jekyll. We can give the Jekyll layout in any GitHub repo by adding _layouts folder. The code is worth a thousand words. Please see the below page for the code reference.

https://github.com/mind-maps/cryptocurrency/blob/main/_layouts/default.html

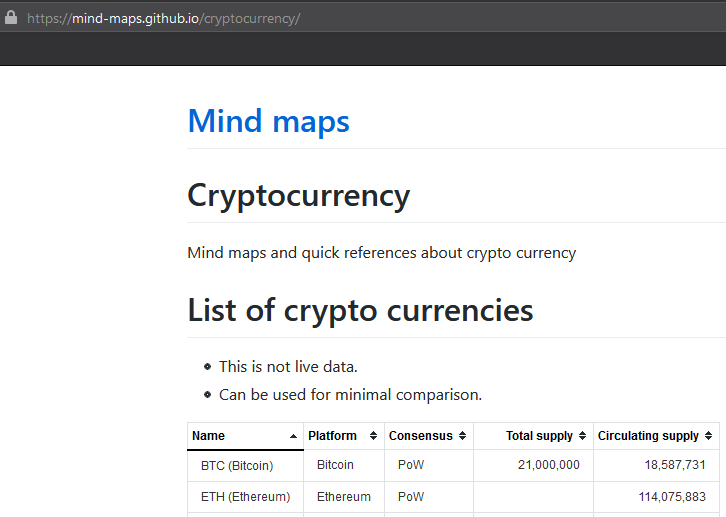
Below is the page in the repo where a sortable table is added.

https://mind-maps.github.io/cryptocurrency/

Solution

After working on the GitHub page for one day, I became lazy and did google again. Finally found the coinmarketcap.com site is providing login experience and can maintain a watch list there with the properties I want to analyze

Reference

https://tympanus.net/codrops/2009/10/03/33-javascript-solutions-for-sorting-tables/

Tuesday, March 20, 2018

Circular relationship diagram for Microservices and Serverless architectures

Microservices is the trend for splitting large systems to individual self contained subsystems. With the advancement of Serverless offerings more and more systems are created or moving towards Microservice approach.

Is Microservice same as Serverless?

Before we go further let us clarify the difference between Microservice and Serverless. There could be some readers who thinks both are same and Serverless is more advanced. To be frank, there are fundamental differences between these two.

Microservice - It is about splitting the systems into small sub systems which are deliverable by them selves. Microservices can be hosted either in Cloud or in onpremise data centers. Microservice has to manage its own data and that data should never be touched by other systems directly.
If the system consists of couple of services and both are maintained by same team, those services doesn't necessarily be separate.

Serverless - It is about freeing the developers from worrying about underlying infrastructure. They just have to write the code and give to the hosting environment. The environment takes care from there about scaling, fault tolerance, patching etc... to maintain a promised parameters such as  predictable throughput, OS level security etc...

Problem

The problem with Microservice is the integration of Microservices. If it is single big monolith system the integration is handled by the class relationship. When we move to Microservice the complexity is moved to the service integration level from the class level. The overall complexity of the system is not changing. It would be easy when we start Microservice based system from scratch or convert existing. But it gets difficult when the count of Microservices goes beyond 50 or 100. Especially to understand their relation to each other. Who calls who and what protocol ie ie dependency. 
The technical solution for this problem is to implement Service mesh or service discovery mechanism so that we have the connection details at central place.

But how do we create a diagram to represent those relationships. If we use traditional blocks and arrows model, it will take more time to understand than the time for coding the same. So lets take another approach.

Circular Relationship Diagram

It doesn't seems that there is a standard name for a diagram which puts the entities in the edge of a circle and shows connections by drawing lines between those through the circle. As programmers lets try to generate one by code than buying a software.

D3.JS for Circular Relationship Diagram

Most of us would be familiar with the D3.JS library for charting in the browser. That library have the support for creating circular relationship diagram. Below goes one link.

http://mbostock.github.io/d3/talk/20111116/bundle.html

The above is not intended for plotting the relationship between the Microservices. But as programmers we can easily change its data to provide our Microservice relationship. The above link doesn't need any server side coding. All it needs is web server to serve HTML pages. It can be IIS, Apache or anything.

Thanks to the D3 library and author of the sample.

Other references

https://github.com/nicgirault/circosJS
https://modeling-languages.com/javascript-drawing-libraries-diagrams/

Tuesday, August 2, 2016

Made JoymonOnline.in responsive without bootstrap

Background

Now a days 'responsive web site' is not an separate requirement. Whatever site we are developing, it must be responsive. But it was not the case with my personal site www.JoymonOnline.in . It was developed long ago when there were not much mobile users. It still uses ASP.Net using Web Forms and there are my own reasons to do so which is explained in one of previous post.

It was difficult to keep my personal site as desktop only. Whenever the url is shared people immediately open in their mobile and looks like is this really belongs to an Application Architect who blogs about JavaScript, HTML5, AngularJS etc...Soon the decision to 'make JoymonOnline.in responsive' has been taken as one of the 2016 goal.

Analysis

The biggest decision was whether to move to ASP.Net MVC or AngularJS along with this effort. Another factor was whether to use any library or framework for making site responsive such as bootstrap. Now a days most of the app including enterprise apps are using bootstrap to make the site responsive.
Since the earlier experience with third party libraries were not good, the decision was to be brave and do it by knowing what is meant by making a HTML page ersponsive instead of just following Boostrap's guidelines. Another decision factor was this is one of opportunity I will be getting to make site responsive without bootstrap. In my day job, Bootstrap seems the default.

Though we have to do from scratch which may take some time to settle down its worth doing atleast one site responsive without Bootstrap to know the basics. Then its easy to approach Bootstrap.

Responsive site without bootstrap

As everybody knows, the secret is media queries in CSS3. I could get a nice article explaining how to make the site responsive in simple steps without Bootstrap. Just followed that and the site became responsive in 2 days.

http://webdesignerwall.com/tutorials/responsive-design-in-3-steps
http://webdesignerwall.com/tutorials/responsive-design-with-css3-media-queries

Responsive Fonts / Typography

This is still a to do item. Though currently font size is not changing its readable in small devices, There are some good articles in internet which explains how this can be done. Its better to follow modular scale if there is not much design background or we are not sure how to decide the font sizes.

Testing for responsive

There are many sites to validate our site for its performance, code quality etc... But I didn't see much automated sites for testing responsiveness of web sites.

There are some sites which loads our site side by side in different device sizes which helps us to understand how our site looks in devices. But I would recommend the F12 browser tools for testing.

http://responsivedesignchecker.com/joymononline.azurewebsites.net
http://mattkersley.com/responsive/

Let me know if you find any bugs related to responsiveness in my site www.joymononline.in

Tuesday, July 19, 2016

Communication between WPF Windows App & HTML Page hosted in WebBrowser control

Context

This can be considered as a continuation of one old post in this same blog. In that post we can see the technique to establish communication between HTML Page inside WebBrowser controls and and .Net application. In this post we are going to see the approach in detail. Code is available for download and is self explanatory.

Technical details


  • For WPF to JS communication
    • WebBrowser control has a method called InvokeScript.
    • This can be used to invoke any JavaScript function present in the rendered web page and pass parameters.
  • For Web page/JS to WPF .Net communication
    • WebBrowser has a property called ObjectForScripting which will be available in JS as window.external
    • If we set an object to ObjectForScripting property, that .Net object will be available in JS and from JS we can call any method on that object which will in turn call the .Net code.

What’s not done

This just proves the technique. Performance testing is not part of this.

Source code

  • The HTML page is inside the WPF.
  • WebBrowser loads the HTML page by using pack: uri syntax.
  • WebBrowser's ObjectForScripting Object is set when the window loads
  • A class which is comvisible is used for the above property
  • From JavaScript the SetAValue() is called to pass data from JS to WPF
  • For WPF to JS myWebOC.InvokeScript() is invoked
  • In JS the data is received in the setSomeText() function.
Download from the below url.

Tuesday, April 26, 2016

Web App or Web Site ie Generating HTML at server v/s client

Most of the tech people know what is what and when to use what. But there are many developers out there in delivery companies who don't know what is the difference and they all call same thing web site sometimes and web app otherwise. This is just to consolidate my understanding about the difference between these 2

Web Site

This is collection of HTML web pages linked together. The pages may be residing as .html page in the web server or web server generates the pages based on the request. For generation of html pages dynamically server side technologies uses html templates which contains tokens. The tokens will get replaced based on the incoming request. Sometimes it reads database for the token value or calls another service for the same. The driving factor is the incoming request.

There were islands of more interactive components using embedding technologies such as Flash, Silverlight or native ActiveX components. JavaScript was used mainly to do simple nice to have things such as validation. The aim was even if the JavaScript is disabled in the browser the app should function properly.

These web sites were catering application needs as well. Eg: we can develop a Employee payroll application using this model.

Technologies
  • PHP
  • ASP.Net

Pros

  1. The site will function even if the JavaScript is disabled in browser
  2. Easy to develop with little js as js was behaving differently in different browsers

Cons

  1. Web Servers have to fetch data from database and mix it with html templates to produce final html which is directly viewable in browser. This overloads the web servers.

Web App

Here mode of accessing the application doesn't change from the end user side. They have to navigate to a provided URL. The content seen in browser is still html. But the difference is, the html template and data are downloaded separately from the server and the mixing happens in the browser. Sometimes if only needs data and instead of html templates it can use JavaScript programs to generate the viewing html.

Here JavaScript plays the key role. If the browser don't have JavaScript support, the application will not function.

Gmail Web interface is a classic example of a Web App.

Technologies

The same server technologies can be used. Just tell them we need only data. Preferably in JSON format. Don't mix with html template as we know how to display your data in browser.

There are technologies such as ASP.Net Web API which are more tailored to web apps.

At client side
  • JavaScript - This is essential
  • Client side frameworks such as AngularJS, knockout js, Bootstrap etc...

Pros

  • Web Servers act as just data provider. Their throughput increases. ie with same no of servers we will be able to serve more users
  • Easy to handle the browser specific formatting such as different view for mobile, tablet etc...Other words responsive UI.
  • Since the server only gives data, it can be consumed by desktop and native mobile apps.

Cons

  • Development team needs to have strong understanding of JavaScript. JavaScript is the tricky language as it contains unwanted things from the beginning. Also this is the language which has a book explaining good parts
    • There is a new trend of transpilation to get rid of this language problem. We can write in different language and then converted to JavaScript for execution.
  • Client side technologies are not stabilized yet. Everyday there are new frameworks getting introduced.

How to select?

We should always choose right technology to right solution. Most of today's apps demand Web App methodology. But there are scenarios where we can use WebSites. For example, simple sites created for personal / business profiles can follow web site methodology. This is because there are only 5-10 pages expected and those can be generated by web servers quickly.

Conclusion

WebSites and Web Apps differ mainly on where the html is generated. There is no change happened to browser during this shift except they increased the speed of JavaScript engine. HTML is HTML always. Most of today's client side machines are capable of generating html in their browsers without any performance lag. Choose the approach appropriately especially when choosing client side JavaScript framework.

References


Tuesday, February 16, 2016

CI & CD for pure HTML+JS browser apps using Travis-CI

When its said pure HTML+JS browser app, it really mean. There is no web services or server side HTML generation involved. Its simple HTML+JS site running inside browser. People may wonder why such an browser app needs continuous integration where there is no compilation involved.

That's true that it doesn't need compilation. But it always can have tests and those tests can be run after each git push and deploy to staging or production. Many of the enterprise people will not have such a scenario of pure client app. However lets look how can we setup Continuous Integration & Continuous Delivery for such an pure HTML+JS SPA.

Objectives

  • Upon git push the integration process should start
  • It should unit test the tests written using Jasmine framework.
  • If the tests are working, deploy to a FTP location in a web site.

Tools & Frameworks used

The app uses HTML5,JS and jQuery. Below is the list used for CI & CD activities.
  • Github - where the code is stored
  • Travis-CI - which provides machine to run the CI & CD activities
  • Jasmine - Test Framework API
  • Karma - Test runner
  • PhantonJS - The headless browser where Karma can run the tests
  • NodeJS
  • NPM Modules other than required by above
    • ftp-deploy

Node.JS

Do not confuse with the usage of Node.JS. We are not going to run anything in server, its pure HTML+JS SPA. NodeJS is just to do npm package management and to upload to FTP for deployment. The test runner Karma which we are going to use comes as npm package. Also this is the language type supported in Travis-CI for pure HTML+CSS+JavaScript projects.

Prerequisites

This assumes the understanding of
  • Basic web development using HTML+JS+CSS (browser side alone)
  • Using Github.
  • Understanding about NodeJS and its package management ecosystem npm.

Setting up source - production & test code

Application

The application which we are going to use is HTML5 based Karel simulator. Instead of creating separate branch inside it's git repository, better we can create another repository named travis-ci-test in Github itself and uploaded the same source there. /Src is the folder which contains source code.

Tests

There is no question that the leader in client side web testing is Jasmine framework. This provides the API to write test code. Since this is not a post to discuss about Jasmine framework, lets go to Jasmine test code directly. The test JavaScript files can reside inside in the /Tests folder.

Running tests using SpecRunner.html

Jasmine is a JavaScript test framework written in JavaScript and run tests inside browser. For that we just need to create a html file and refer Jasmine js files, app/production js files and test scripts. In this case a SpecRunner.html is available in below location. Browsing it will run the tests and show the results.


Make sure the tests are running from SpecRunner.html. It is always recommended to do a big job in small tasks which can be done in less than 1 hour.

Setting up NodeJS & NPM

The above setup will work really great in our machine. But when in CI environment, we need to run the tests from program. Travis-CI doesn't have client side only JavaScript+HTML app support. But it has node_js support which we can leverage here to test our app.

Next step is to add some Node.JS things. Basically we need to convert our folder to Node.JS application. We can create/convert a Node.JS app by simply issuing 'npm init' command, from any command prompt inside our folder. It will ask for some questions and will create package.json file.

Introducing Karma & PhantomJS

Once our folder is npm enabled or in other sense we got a package.json, we can install packages. Karma is a test runner program which can run our Jasmine tests we wrote in previous step. The JavaScript needs a engine to execute the script and Karma is not a js engine. So it needs a js engine. It can either use any browser itself or can use headless browser called PhantomJS. PhantomJS comes as npm package. All the packages mentioned till here can be installed via npm. See the devDependencies section in package.json file for the packages what we need.

In our local machine we can use npm install <package name> --user-dev command to install the packages. But in CI machine, it will do automatically by reading the package.json.

Setting up Karma & PhantomJS

Karma wants to know where are the production & test js files to run tests. For that it needs a config file. In this case, its  karma.config.js


This file can be created using karma init command. It will ask some questions and create the file. This file is self explanatory.

How npm knows Karma is the test runner to be used

Once the setup is done we are going to execute the tests by issuing below command.

npm test

How does npm knows to run the tests using Karma? Its again configuration inside package.json.

There is a section called 'Scripts' and it contains 'test' section inside. Test node expects an executable command. There we can give the command to run Karma along with karma config we created in previous step.

Once this step is proper we should be able to issue 'npm test' command and it should should run the tests and show results. Testing every step is important.

Upload to FTP via ftp-deploy npm module

Now comes to deployment. If all the tests are passed, we can deploy to our staging or production environment. In this case I want to deploy to a FTP location. The hosted CI platform Travis-CI which we are going to use, doesn't have direct support to deploy a folder to FTP. We had to rely on curl command which can transfer one file at a time. One file at a time doesn't work most of the time.

Now there are 2 ways
  • Use tools such as grunt / gulp which can orchestrate the CI activities. They have FTP deploy methods.(Google knowledge. Didn't try myself)
  • We can write some code in shell script or NodeJS and hook it after the tests run successfully.
As there are already enough tools and technologies just for CI & CD than the production code, lets write some custom NodeJS code to upload files to FTP. No to Grunt and Gulp for now.

The written FTP upload code uses ftp-deploy npm package to upload the files. Why should we rewrite code again for reading the folders, reading the files and to upload using FTP protocol. That is something many people already solved and made open source.

The FTP code can be hooked to the integration process after test by editing the package.json file. We can use 'posttest' section for it.

Testing everything in local machine

If the above environment is ready, we should be able to run everything in our machine. The command 'npm test' should run the unit tests and if everything pass, deploy to FTP folder. In our local environment to work we need to give the FTP credentials to ftpupload script via environment variables. We will see why its via environment variables in next section.

Intro to Travis-CI and getting started with it

Travis-CI is a free hosted CI&CD SaaS environment for open source projects. This is similar to AppVeyor. We could have used AppVeyor which is already referred in previous posts and have already used in other .Net projects. But this time lets try something new. Below are the steps to achieve the same.

  • Upload the code to Github.
  • Create account in Travis-CI using Github.
  • Connect to Github project.
  • Setup below environment variables for FTP access.
    • ftp_host
    • ftp_user
    • ftp_password - Do not turn the flag to display in build log. Build log is public
    • ftp_localPath - Path to the folder inside the CI machine. Usually src
    • ftp_remotePath - Path to where the files should be copied. Only relative url
Refer a build log for sample values. Once this is working. Just do a push to Github to start the integration process.

UI testing in Travis-CI

Travis-CI don't support running in chrome out of the box. They are telling we need to give some commands to get it running. To me it didn't work out. It tried 2-3 times and said failed to start Chrome. So decided to use PhantomJS. Anyway in this sample application, the main objective is test the JavaScript. So it works.

If there are any steps missing and difficult to follow just fork / download the sample. There is no good documentation than the code itself.

References

http://orizens.com/wp/topics/first-steps-in-setting-up-travis-ci-to-your-javascript-project/
https://blog.logentries.com/2015/01/unit-testing-with-karma-and-jasmine-for-angularjs/
http://swizec.com/blog/how-to-run-javascript-tests-in-chrome-on-travis/swizec/6647
http://gis.utah.gov/how-to-wire-up-travis-ci-to-your-js-projects/
http://www.sitepoint.com/testing-javascript-jasmine-travis-karma/

Tuesday, December 8, 2015

Karel source hosted to Github

2 years back, I have created a educational tool called Karel in Javascript. The idea was not at all mine. I just visualized the idea in Javascript only as part of learning HTML5 canvas. The idea was to publish the source in some open source public repository. But unfortunately that missed from my attention.

Recently I could see a repo which is based on my Karel. There the language is changed to Czech and used Jison parser. I really don't know what is that Jison parser. He might have done some work to extract the code from the application page. It will never be easy as forking from Github.

It really made me to publish the code in open source space as soon as possible. In case somebody needs to do something on top of it, they should be able to jump start in couple of clicks.

Here is the repo in Git

https://github.com/joymon/Karel

I am planning to convert Karel to TypeScript. TypeScript really gives a feel that we can develop big maintainable applications in Javascript.

Tuesday, July 7, 2015

Developing Electron HTML5-Javascript desktop application in Windows 7

What is Electron?

The official repository says "Build cross platform desktop apps with web technologies". Its really true but it comes with some limitations. We cannot write system programs or device drivers with this. Its a wrapper over Chromium with native pluggable points to provide a platform for rendering HTML and running Javascript inside executable. Yes its true that we can develop cross platform windows desktop application using HTML and Javascipt. Similar to creating windows 8 or universal apps using HTML5 and Javascript. Advantage with Electron is, it can run in different operations systems such as Linux, OS X along with Windows.

Just look at official repository to understand this "our own mini chromium browser which can render our html javascript application".

https://github.com/atom/electron/blob/master/docs/tutorial/quick-start.md

Steps to setup environment

We can setup in multiple ways. The easier way I found is given below
  1. Go to the release page in Eletron Github repository.
  2. Download the latest platform version. At the time of writing this post the version is 0.28.3 and file size is around 46 MB.
    1. Take the 64 bit version if you have the 64 bit machine. The format is electron-vx.xx.xx-win32-x64.zip .Eg electron-v0.28.3-win32-x64.zip
  3. Extract to c:\Electron\ . It can be to any folder but just for simplicity put in c: drive itself.
  4. Double click on C:\Electron\electron.exe file to test the Electron runtime. We can see a default application has started. The source code for this application will be found in C:\Electron\resources\default_app

Steps to create new project

  1. Create a folder for our app anywhere in the file system. In Electron desktop app is similar to web app which is a folder of html, javascript and other resource files. For ease of explanation we are assume that the path is c:\apps\testelectron
  2. Copy package.json, index.html, and main.js from C:\Electron\resources\default_app into c:\apps\testelectron. This will get us the starting point similar to File->New ->Project in Visual Studio
  3. Clean up index.html
    1. Remove all styles and scripts
    2. Change the title tag content to "My First Electron Application"
    3. Make sure body contains only the word "Hello world"
  4. Replaces the contents in the main.js with the main.js contents from Github help page 
  5. Now run the project by any of the following methods
    1. In command prompt type c:\Electron\Electron.exe c:\apps\testelectron
    2. Start Electron.exe by double clicking and drag and drop the testelectron folder into the window.

Hide F12 Developer tools in Electron application

Debugging Electron apps

As we are seeing we gets our favorite F12 dev tools to debug our app. By default the developer tools will be visible when we run the application. To hide that remove the below line from main.js.

mainWindow.openDevTools();

Avoid default Electron menu on our application

Now our application is running from Electron shell. The Shell shows the menu. We may check this by looking at the C:\Electron\resources\default_app. To remove that we need to make sure our app is the only one started. To do so copy testelectron folder into C:\Electron\resources and rename testelectron folder to app.

Some magic happens and now if we double click on Electron.exe our application will start alone :). As you know computer cannot do magic. Its all convention defined by developers to speed up the process.

Packaging and distributing

Just refer the official documentation on packaging and distribution.

Pros

  • One language and technology for web and windows. This helps the developers focus on the business goal rather than spending time on google to learn technology and language.
    • Can leverage javascript frameworks such as angular, jQuery etc...
  • Leverage async programming model from node.js modules.
  • Easy portability. No need to maintain different code bases.
  • Comes with Chromium's process model. Each window is different process. This reduces chances to crash if we build big apps. Also minimize the memory leak as the process itself gone when a window is closed.
  • Package management done via Node Package Manager (NPM)

Cons

  • Its heavy. Need to package runtime with our app.
  • Not all native operations can be done.
  • As always need to use only The Good Parts of javascript
  • Process model put overhead on window communication. Need to use IPC. Also it takes more total memory than single process model.
As of Microsoft, they use this technology in their new VSCode code editor. Similarly many big players are adopting it. Its worth taking a look.

Tuesday, July 29, 2014

Android - Making Facebook login works in HTML5 app hosted inside WebView

Context - Develop one app for all machines / platforms.

The software stake holders always want to target a large audience regardless of what machine / plat form their clients uses. That is one of the reason why software are often written as web application. If we write as web application, at least in theory it can run in any machine whether it is laptop,tablet or mobile also regardless of the OS Windows / Linux / Mac used in those machines. Another advantage going with web is the less development cost as we are developing one application. Its the trend among the developers / organizations.

There are so many arguments going on whether we should go with this HTML5 web apps to address this problem in case we are targeting mobile platforms only. Some people argue that we should go with Xamarin kind of converging platforms. But that won't help to run the app in laptops.

Another requirement from the stakeholder will be to have native web app even if we have working web application. That is to make sure the application is present in the app stores in the way standard mobile applications are present and users don't need to worry about the web application url. They just need to install the mobile app from the store.

So only one way to meet the above requirement of running in desktops, laptops and as native mobile app is to develop application using HTML5 and create native wrapper applications which uses WebBrowerControl / WebView to show the HTML5 web site inside the native mobile app.

But will that make our the development life easier? If the application is very simple, it is easy. But when the application gets more features, problems will starting popping up. Below is one of the problem we faced in such a scenario.

Problem

The application needs to have Facebook login. It is easy to setup that using the Facebook javascript sdk. It worked well when we try this from laptop and the mobile browser. But when the same is tried from native Android wrapper we got an issue. After Facebook login, it ends up in a blank white page. 

The analysis leads to Android WebView limitations. The Facebook login SDK normally creates browser window child window and after login it will close that window and control will be passed to parent window. But when we show the same page using Android WebView control. That javascript popup window closing is not working.

Solution

The solution is as follows 
  1. Show the FB login popup in a different WebView control
  2. After the login success, close that window. 
How do we achieve that? Below are the tasks to be done.

Task 1 - Show login popup in different WebView

There is already a WebView in the application. We need to catch the javascript popup show event happened inside the web page and show that popup in a different WebView control. To do that we need to follow steps below
  1. Subclass WebChromeClient and override it's onCreateWindow method. Name it as UriWebChromeClient
  2. From the onCreateWindow method create object of new WebView control and add to the view.
    1. When we create the second WebView control, associate that to our custom WebViewClient which we are going to create in Task 2. That is required to close this second WebView.
  3. The new UriWebChromeClient class object needs to be connected to the existing WebView by calling webViewObj.setWebChromeClient() Method

Task 2 - How to know FB authentication is success to hide WebView

Now we need to think how the Android web view knows whether the FB login is successful. It can only be determined by looking at a particular URL(https://m.facebook.com/v2.0/dialog/oauth) where the FB will be redirecting after login success. How do the Android web view knows that the web redirection happens? It can be done by sub classing WebViewClient class. Steps below
  1. Subclass the WebViewClient class.Name it as UriWebViewClient
  2. Override the onPageFinished() method of WebViewClient in the new inherited UriWebViewClient class and check for the url. If the URL is "https://m.facebook.com/v2.0/dialog/oauth", we can decide that the FB authentication is completed and its time to hide the second WebView.
  3. Override the shouldOverrideUrlLoading() method too and do the similar.
The code is mentioned in this SO link .Only difference from this link is the onPageFinished method overriding.

Reference links

Tuesday, September 3, 2013

Reading formatted MS Excel cell values using Open XML SDK and showing as HTML

Most of the existing mechanisms which helps to access Excel cells from our applications doesn't give us the formatting of the excel cell. If we select the excel data using OleDB connectors it return plain text. The Excel COM interop give more, but it gives format details for entire cell. What about an Excel cell contains data like below and we want to show the excel cell values with formatting in a MVC application using a Rich Text Editor say KendoUI editor?

Bold data,
Italics, Underlined and big font in green color

Since everything in new Excel file format is XML based and open, the sdk provides the options. But not as easy as we think. We need to get the reference string and we need to iterate through the RunProperties collection. The code is as follows

private string GetCellValue(Cell excelCell)
        {
            if (excelCell == null) 
                return null;
            if (excelCell.DataType == null)
                return excelCell.InnerText;
 
            string value = excelCell.InnerText;
            switch (excelCell.DataType.Value)
            {
                case CellValues.SharedString:
                    value = ReadFromSharedString(excelCell);
                    break;
                case CellValues.Boolean:
                    switch (value)
                    {
                        case "0":
                            value = "false";
                            break;
                        default:
                            value = "true";
                            break;
                    }
                    break;
            }
            return value;
        }

This starts with the assumption that you have basic idea how to obtain Excel Cell object using open xml. If you are not clear on it please refer the link. Make sure you have the open xml sdk dll named DocumentFormat.OpenXml.dll. You may download from this link too.

What is SharedString and ReadFromSharedString? Actually excel keeps a reference to the value and the actual value will be there in a different node. The reference will normally be integer and that will be stored in the excelCell.InnerText property.Lets see the code for ReadSharedString();

private string ReadFromSharedString(Cell cell)
{
    string value = cell.InnerText;
    SharedStringTablePart sstPart = GetSharedTablePart(cell);
    // lookup value in shared string table
    if (sstPart != null && sstPart.SharedStringTable != null)
    {
        int index = int.Parse(value);
        if (sstPart.SharedStringTable.ElementAt(index).ChildElements.Count == 0)
        {
            value = sstPart.SharedStringTable.ElementAt(index).InnerText;
        }
        else
        {
            //ChildElements is collection of Run
            value = GetStringValueFromRuns(sstPart.SharedStringTable.ElementAt(index).ChildElements);
        }
    }
    return value;
}


First part is about how to get the SharedStringTablePart object? Next is about why we are calling GetValueFromRuns(). First things is simple. You can understand by looking the below code. Second one I will explain after the code segment to get the SharedStringTable.


private SharedStringTablePart GetSharedTablePart(Cell cell)
{
    Worksheet workSheet = cell.Ancestors<Worksheet>().FirstOrDefault();
    SpreadsheetDocument doc = workSheet.WorksheetPart.OpenXmlPackage as SpreadsheetDocument;
    SharedStringTablePart sharedStringTablePart = doc.WorkbookPart.GetPartsOfType<SharedStringTablePart>().FirstOrDefault();
    return sharedStringTablePart;
}


Now coming to the GetStringValueFromRuns. Basically the cell data is arranged as series of Run elements. Each run element represents unique formatting and corresponding text.In this case 'Bold Data' will be a run element and 'Italics' will be next run element. So we need to iterate the run collection and create the required formatting.


private string GetStringValueFromRuns(OpenXmlElementList openXmlElementList)
{
    StringBuilder text = new StringBuilder();
    foreach (Run run in openXmlElementList)
    {
        //    //t ADD OPENNING TAGS HERE, if any
        if (run.RunProperties != null)
        {
            foreach (OpenXmlLeafElement element in run.RunProperties.OrderBy(e => e.LocalName))
            {
                //StartTagWrite is the extension method.
                element.StartTagWrite(text);
            }
        }
        text.Append(run.Text.Text.Replace("\n","<br/>"));
        if (run.RunProperties != null)
        {
            foreach (OpenXmlLeafElement element in run.RunProperties.OrderByDescending(e => e.LocalName))
            {
                element.EndTagWrite(text);
            }
        }
    }
    return text.ToString();
}


Each Run will be having Run properties which define the attributes of each run. Important thing to note down is the Run properties classes are different in different Office versions.

Note the extension methods StartTagWrite and EndTagWrite. Those are defined in a different class


    static class Extension
    {
        public static void StartTagWrite(this OpenXmlLeafElement runElement, StringBuilder writer)
        {
            IWriteOperation x = new HTMLWriteOperation { Writer = writer };
            x.StartTagWrite((dynamic)runElement);
        }
        public static void EndTagWrite(this OpenXmlLeafElement runElement, StringBuilder writer)
        {
            IWriteOperation x = new HTMLWriteOperation { Writer = writer };
            x.EndTagWrite((dynamic)runElement);
        }
    }

Here comes a design challenge. Look at the casting using dynamic. This is because each run property is different class. ie there is no base class for run properties. The property class Bold , Italic and Color don't have a common base. The base which we gets is the OpenXmlLeafNode. This is in fact a base class for many nodes other than Run properties. So we need to use the dynamic casting and call the method. Since its dynamic it will call corresponding methods defined in the interface.Below is the interface declaration and corresponding class


private interface IWriteOperation
{
    void StartTagWrite(Bold bold);
    void StartTagWrite(Italic it);
    void StartTagWrite(Underline underline);
    void StartTagWrite(Color c);
    void StartTagWrite(Font font);
    void StartTagWrite(FontSize fontSize);
    void StartTagWrite(FontFamily fontFamily);
    void StartTagWrite(FontScheme fontScheme);
    void StartTagWrite(RunFont runFont);
    void StartTagWrite(Strike strike);
    void StartTagWrite(VerticalTextAlignment vertialAlignment);
    void StartTagWrite(Shadow shadow);
    void StartTagWrite(Outline outline);
    void StartTagWrite(Condense condense);

    void EndTagWrite(Bold b);
    void EndTagWrite(Italic b);
    void EndTagWrite(Underline b);
    void EndTagWrite(Color u);
    void EndTagWrite(Font u);
    void EndTagWrite(FontSize u);
    void EndTagWrite(FontFamily u);
    void EndTagWrite(RunFont u);
    void EndTagWrite(FontScheme u);
    void EndTagWrite(Strike u);
    void EndTagWrite(VerticalTextAlignment u);
    void EndTagWrite(Shadow u);
    void EndTagWrite(Outline u);
    void EndTagWrite(Condense u);
}
private class HTMLWriteOperation : IWriteOperation
{
    public StringBuilder Writer { get; set; }

    void IWriteOperation.StartTagWrite(Bold iThing) { Writer.AppendLine("<B>"); }
    void IWriteOperation.EndTagWrite(Bold iThing) { Writer.AppendLine("</B>"); }

    void IWriteOperation.EndTagWrite(Underline aThing) { Writer.AppendLine("</U>"); }
    void IWriteOperation.StartTagWrite(Underline aThing) { Writer.AppendLine("<U>"); }

    void IWriteOperation.StartTagWrite(Italic aThing) { Writer.AppendFormat("<I>"); }
    void IWriteOperation.EndTagWrite(Italic aThing) { Writer.AppendFormat("</I>"); }

    void IWriteOperation.StartTagWrite(Strike u) { Writer.AppendLine("<del>"); }
    void IWriteOperation.EndTagWrite(Strike aThing) { Writer.AppendLine("</del>"); }

    void IWriteOperation.StartTagWrite(Color u)
    {
        if (u.Rgb != null)
        {
            string colorFormat = @"<span style=""color:#{0};"">";
            string span = string.Format(colorFormat, u.Rgb.Value.Substring(2, 6));
            Writer.AppendLine(span);
        }
    }
    void IWriteOperation.EndTagWrite(Color aThing)
    {
        Writer.AppendLine("</span>");
    }
    void IWriteOperation.StartTagWrite(RunFont u)
    {
        if (u.Val.HasValue)
        {
            string fontFormat = @"<span style=""font-family:'{0}';"">";
            string span = string.Format(fontFormat, u.Val.Value);
            Writer.AppendLine(span);
        }
    }
    void IWriteOperation.EndTagWrite(RunFont aThing)
    {
        Writer.AppendLine("</span>");
    }

    void IWriteOperation.EndTagWrite(FontSize aThing)
    {
        Writer.AppendLine("</span>");
    }
    void IWriteOperation.StartTagWrite(FontSize u)
    {
        string fontSizeFormat = @"<span style=""font-size:{0}px;"">";
        string span = string.Format(fontSizeFormat, u.Val);
        Writer.AppendLine(span);
    }

    void IWriteOperation.StartTagWrite(Font u) { }
    void IWriteOperation.EndTagWrite(Font aThing) { }

    void IWriteOperation.EndTagWrite(FontScheme aThing) { }
    void IWriteOperation.StartTagWrite(FontScheme u) { }

    void IWriteOperation.EndTagWrite(Condense aThing) { }
    void IWriteOperation.StartTagWrite(Condense u) { }
    
    void IWriteOperation.EndTagWrite(VerticalTextAlignment aThing) { }
    void IWriteOperation.StartTagWrite(VerticalTextAlignment u) { }

    void IWriteOperation.EndTagWrite(Shadow aThing) { }
    void IWriteOperation.StartTagWrite(Shadow u) { }

    void IWriteOperation.StartTagWrite(FontFamily u) { }
    void IWriteOperation.EndTagWrite(FontFamily aThing) { }

    void IWriteOperation.StartTagWrite(Outline u) { }
    void IWriteOperation.EndTagWrite(Outline aThing) { }   
}

Reading a cell using OpenXML itself involves lot of code. So this is certainly not going to be easy to understand. Let me know if anybody needs a sample which does it.

Monday, June 3, 2013

Online Karel Simulator based on HTML5 & Javascript

Karel is an educational programming language for beginners, created by Richard E. Pattis in his book Karel The Robot: A Gentle Introduction to the Art of Programming @wiki
If you are not familiar with what is Karel in programming, please read this wiki page. As I mentioned in one of my previous blog post, I got to know about Karel, while preparing for a session of Programming for non programmers. It's such a simple language that, anybody can teach programming or use for self study. Universities such as stanford are using this simple language to teach programming methodology to it's students. If you studied / studying in new generation Indian engineering colleges, sorry you don't get this easy option of studying programming. I don't want to use the term 'self financing colleges' where your teachers will be your seniors who just passed in the previous year. I am sure on this, because I studied in this type of college, where I had seen people repeatedly saying 'public static void main...public static void main' during the lab exam days.

Whatever it is, this post is written to not to describe about the colleges, but to talk about Karel language, and a small HTML5 based Karel simulator, I wrote in the javascript language to execute Karel programs. The story which lead me to develop this simulator is as follows.
  • I found the language very simple & interesting to teach programming.
  • The main attraction is the way, we can teach programming to non programmers by simply saying we are controlling a Robot named Karel by some instructions.
  • I could see some interesting simulators where an animated character Karel, is acting as per the program execution.
  • None of those simulators are easy to set up in our environment.
    • Either they are written in Java or other language which is not easy to set up in my environment.
    • Got one .Net simulator using Visual J++, and that story I explained in previous post
  • No HTML JS based simulators, which can be easily set up as browsing a web site.
  • After more google, I decided to create the first one myself.

Karel the robot learns javascript

If you go to the Stanford page, you can see "Karel the robot learns Java". I just borrowed that and changed it to javascript, on a belief that, they will not file patent case on me. This means the simulator is not supposed to run the original Karel language. It can run the Javascript, which will take effect on the Karel standing at the right side simulation area.

What Karel language supports

There are fundamental 2 things which Karel can do.They are
  • turnLeft
  • move (move one cell in the direction which Karel facing at the moment)
This turns to 2 methods in the Javascript. These methods can be used to write the program in conjunction with the other javascript language features such as if, loops, methods etc...If you want to turn the Karel to right direction you need to issue 3 turnLeft instructions or write a turnRight method which contains these 3 instructions or a loop which does the same.

Javascript function to Turn Karel right


//Program to turn Karel right
turnRight();
function turnRight(){
    turnLeft();
    turnLeft();
    turnLeft();
}

How to work with Karel simulator

Write the javascript program at the right side text area and click on "Run program" button at the bottom of text area. You can see the Karel is obeying your instructions.

Want to try HTML 5 JS Karel simulator 

I have hosted it in my own website http://joymononline.in . URL link is 

Source code of Karel simulator

If you have experience in Javascript you might have guessed the core technique behind the simulator. It's the same eval() function in Javascript. There are 2 global functions turnLeft() and move() written and those functions are being invoked from the user input program by using eval method.

I will upload the source later to one public repository.

Tuesday, August 7, 2012

Useful links to HTML5

I don't think you have any doubt about HTML 5 as future technology. Below are some links which I think useful for HTML5 learners.
Tutorials
Browser compatibility
Now the HTML5 is in evolving phase so we cannot expect every browser to render the tags properly.Sometimes the browser may not have the support for that tag. Below are some links to deal with that
HTML5 slide show technologies
HTML 5 is really good to create stunning presentations like Microsoft Powerpoint. I can strongly say that at some point in future the HTML5 will replace the Microsoft Powerpoint. Hope the next version of Power point itself will have "Save As HTML 5 slide show" menu option :-)

The main advantage is we can host the html page in web and share easily without a need for extra application.ie simply web based slide show

Q&A
 Hope I can add more...

Wednesday, June 8, 2011

Schema.org a new SEO technique

How search engines identify your site and its contents is a big question ever.We had tried so many techniques to list our sites in the search engines based on some key words.But if somebody adds more words their site will overtake ours. Now the major search engines unite together to have a common schema for the web data. ie as a web developer we can tell the search engine about the nature of our site. The schema contains itemscope and itemprops using which we can specify the category of the data in the site. If our site is to list the movies we can specify our movie name html element as Movie and director name as itemprop director.

This enables the search engines to identify that this data is about a movie and the director name is mentioned.So search engines can store them structurally which help to give better search results.one eg is given below which I took from google blog.

<div itemscope itemtype ="http://schema.org/Movie">
<h1 itemprop="name">Avatar</h1>
<span>Director: <span itemprop="director">James Cameron</span> (born August 16, 1954)</span>
<span itemprop="genre">Science fiction</span>
<a href="../movies/avatar-theatrical-trailer.html" itemprop="trailer">Trailer</a>
</div>


see the new words itemscope,itemtype and itemprop.These are the special schema words to identify the category of the data in our site which helps the search engines to build a good search index .


So what are the keywords or categories available? the schema.org answers this.You may get the details from their site.http://schema.org/docs/gs.html


As I mentioned earlier ,another important aspect is this is a combined effort from the major search engines such as google,yahoo & bing.Clicking on the link will give you what they say about schema.org.

Monday, November 22, 2010

HTML 5

I am hearing about HTML5 & CSS3 for a quite long time but not able to try it out.Today I got a chance to play around with HTML5.As always I started with platform to run ie what are the browsers supporting HTML 5.I got a good list .

Table of browsers supporting HTML5 & CSS3 and their versions.

In this above table I recommend Chrome.Then I started for editors.But I was not able to find a good one as it is a new technology.But there is one online editor which I feel ok for starters.

http://rendera.heroku.com/ – Online HTML 5 editor

My next search was to find out what is new in these.I got another list from my favorite site W3Schools.

http://www.w3schools.com/html5/html5_new_elements.asp

Among the list of new things, I struck with the most attractive and useful tag which is nothing but Canvas.Its a drawing surface where we can draw shapes using javascript.There are so many things we can achieve through canvas.Hope I can share that later.