Tuesday, November 26, 2019

Why my SQL Server is not using all the CPU cores when count > 40?

We recently upgraded one of the SQL Server environments from E32s V3 (32Cores, 256GB) to F64s V2 (64Cores, 128GB) Azure machine tier.  That was on the assumption that the CPU is peaked on load but memory is enough.

Surprisingly the application slowed down drastically!!

The initial hypothesis we came up is because of less RAM in the F64s V2(128GB) the system slowed down. But we didn't see any memory pressure in the performance counters. Then we run one more test and observed a peculiar behavior. During the load, not all 64 logical processors are getting utilized. That leads to further investigation and ended up in below message in SQL Server event logs


Date        11/20/2019 5:33:09 AM
Log        SQL Server (Archive #1 - 11/23/2019 2:05:00 PM)
Source        Server
Message
SQL Server detected 2 sockets with 16 cores per socket and 32 logical processors per socket, 64 total logical processors; using 40 logical processors based on SQL Server licensing. This is an informational message; no user action is required.

Licensing problem! Yes due to lack of Core-based licensing, it is not able to leverage all the cores. 

But wait a minute. We earlier had 32 cores only but now we have at least 40 cores in action though we have 64 in the machine. 40 should ideally perform better than 32.

In the meantime when we run the below query it returned all 64 cores.

SELECT cpu_count
FROM sys.dm_os_sys_info

We have Microsoft support and below is the response got from them on why with 40 cores it is not performing well. ie if SQLServer is capped by lack of core-based licensing, why it will slow down.

NUMA & SQL Server Schedulers

SQL Server has its own operating system (SQLOS) that handles task management. SQLOS assigns one scheduler per logical processor to handle user based queries. Schedulers that are available to run user queries are considered online; schedulers that could run user queries but are not available to do so are considered offline. When the SQLOS starts it brings schedulers online on the first NUMA node, then the second, third, etc. until all schedulers are online or the CAL limitation has been reached.
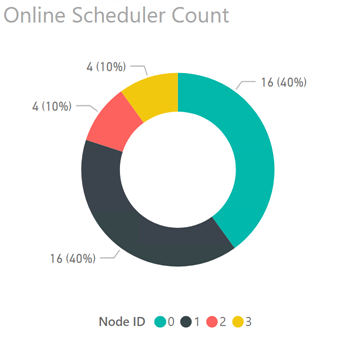
The chart below shows a summary of the online schedulers under CAL licensing:

Each new connection to the instance is assigned a NUMA node based on a round-robin algorithm, e.g. connection 1 is assigned to NUMA node 0, connection 2 is assigned to NUMA node 1, connection 3 to NUMA node 2, connection 4 to NUMA node 3, and so on. (For more information on how scheduling algorithms work in SQL 2012 see How It Works: SQL Server 2012 Database Engine Task Scheduling at https://blogs.msdn.microsoft.com/psssql/2013/08/13/how-it-works-sql-server-2012-database-engine-task-scheduling/)
Under CAL based licensing SQL Server used all 16 logical CPUs on NUMA nodes 0 and 1 (80% of online schedulers) and 4 logical CPUs each on NUMA nodes 2 and 3 (20% of online schedulers); due to the round-robin assignment of new connections each NUMA node handled up to 25% of the total query workload. This resulted in Nodes 0 and 1 being relatively idle while Nodes 2 and 3 are always in use. The imbalance in workload results in a noticeable difference in performance for queries running on Nodes 0 and 1 vs Nodes 2 and 3. Essentially, Nodes 2 and 3 have between 2-4x the load factor of Nodes 0 and 1 at any given time.

Further reading

Tuesday, November 19, 2019

Azure @ Enterprise - Microsoft Identity Platform - Minimal configurations to enable AAD authentication in AppService WebApp

Welcome to Azure @ Enterprise series. In this post, we are going to discuss something about the Microsoft Identity Platform formerly known as Azure Active Directory Developer Platform or AAD v1. We will be seeing how to enable authentication to an Azure AppService Webapp using the Microsoft Identity Platform. There are many tutorials available on the internet to do the same thing. So why one more?

This tutorial is to demonstrate the procedure with minimal configuration settings. Please note that this is not the quickest. For the quickest, please refer to the link provided which uses the express configuration mode.

https://microsoft.github.io/AzureTipsAndTricks/blog/tip184.html

The problem with express settings is that we cannot understand what is going on behind the scene. Sometimes we don't get predictable results when we want to replicate in different environments.

Prerequisite

It would be really great if we have a basic understanding of some concepts to understand better.

- Basic knowledge about web applications and authentication
- Basic knowledge about Azure Web Apps and hosting to Azure
- Basic knowledge about Azure Active directory

Phase 1 - Create and host web application to Azure web app

The aim of this phase is clear as just hosting a new web application into the Azure web app. After hosting, the web application is expected to be accessible anonymously through the internet by just using its URL. Anonymous means without any login mechanism. We will be using Microsoft Visual Studio 2019 to complete the steps in this phase. It can create and host web applications to Azure as App Service Web App.

This phase has multiple steps. The first step open Visual Studio 2019, then creates a new web project. Do some changes to distinguish our application. Test by pressing the run button. It will start a development web server and open the browser pointing to the development server.

Once we feel comfortable with the application, we can publish it to Azure App Service Web App. 
  1. Right-click on the project
  2. Select publish
  3. It will open
Note the URL of the web app which is ending with .azurewebsites.net. Let's take the application URL as https://aadapp.azurewebsites.net/

Phase 2 - Create an Azure AD App Registration

The second phase is to create an App Registration in Azure Active directory. 

The first step here is to go to the Azure portal then to Active directory and click 'App registration' to reach the app registrations page. Create new app registration. Give the name. It is just a display name. For the time being, select the first option in the "Supported account types" radio button group. This will not help if we need to get users from other AAD tenants logged into our application. The next input which is Redirect URI labeled optional is the tricky one. For the use case in this post, we need to fill the URI. The URL is our Azure App Service Web app URI suffixed with '.auth/login/aad/callback'

In this case, the URI would be

Now its time to click the 'Register' button which creates app registration.

The next step is to clean up unwanted settings in App Registrations so that it has minimal settings. Go to 'Authentication'. Click on the 'Try out the new experience' button. This blade would someday get rid of the old experience so better to try the new experience at the earliest. We need the 'Redirect URI'. Logout URL we can skip for now. Make sure the ID Token is checked in the Implicit grant section. No need to treat as a public client as we are not using any of the flows listed. Supported account types section has the value which allows authentication of accounts in one AAD tenant. 

Now lets clean up the Certificates and secrets blade. Since this App registration is not going to be used for getting tokens it doesn't require any secrets.
Next blade called 'API permissions' will have some permissions filled up by default. For our use case that is not required. So let us remove it.
'Expose as API' blade has scopes and authorized client applications. Those are not required for our use case. Simply clean those too in case something there.
The other blades 'Owners', 'Roles and administrators' don't have anything with the auth flow. Manifest has the JSON representation of the resource. Nothing to do there.

Phase 3 - Enable Web App to authenticate via App Registration

Previous phases created a publicly accessible web application and app registration. Apart from Redirect URI, there is no relation between those 2 things. The web application still works anonymously. This phase is to connect the web application to the app registration so that it will force the users to get authenticated via Azure AD.

The first step is to go to the 'Authentication / Authorization' blade. Then turn the App Service Authentication on.
Now select the action to take when a request is not authenticated. It is 'Log in with Azure Active Directory'.
The next step is to configure the Active Directory provider. Click on the Activity Directory option to see the settings. Select the Advanced mode as we are all advanced users. Enter the App registration id into the 'Client ID' field. Isser Url is essential and it can be crafted by prefixing https://login.microsoftonline.com/ to the Azure Active Directory Tenant Id.  It will end up something like below.

https://login.microsoftonline.com/ea1945af-c42b-4482-89e8-abf25ba86249

Press 'OK' then click on 'Save' to save settings to the web application.

Testing

Make sure the cache is cleared in case it is the same browser instance that opened the page earlier. Better open an incognito window and browse the App Service Web App URL. It will redirect to the Azure AD login page. Enter the credentials of a user who is in the same Active Directory Tenant. Remember the setting we gave while creating App registration. If the credentials are right, the browser will redirect back to our Azure App Service Web application URL and shows the page.

More testing

How do we ensure the login really happened? Is it serving the page anonymously even after login? We can see the logged-in user details using a magic URL.
https://aadapp.azurewebsites.net/.auth/me

Video

Step by step video can be found on youtube.

References & Troubleshooting

Details about the openid configuration.
https://login.microsoftonline.com/{AAD Id}/v2.0/.well-known/openid-configuration

https://login.microsoftonline.com/common/v2.0/.well-known/openid-configuration

Tuesday, November 12, 2019

Power BI Desktop Dashboard for IIS Log Analysis - Improved performance of PowerShell data prep script

This is the third post in the "Power BI Desktop Dashboard for IIS Log Analysis" series.

Power BI Desktop Dashboard for IIS Log Analysis
Power BI Desktop Dashboard for IIS Log Analysis - C# for IIS log parsing instead of PowerShell
Power BI Desktop Dashboard for IIS Log Analysis - Improved performance of PowerShell data prep script

Here we will be discussing how the data preparation process is enhanced by just using the LogParser command. In the initial versions, the time to prepare CSV from the .log file was high if the cs-byes and sc-bytes columns were missing. That is because the approach taken was to load the CSV file into PowerShell and add additional columns with a default value.

This time the approach changed a little bit and completely avoided the need to load CSV files into PowerShell. Logic is as follows

  1. Try to convert the input log files as-is on the assumption that the log contains all the required fields including cs-bytes and sc-bytes. This uses LogParser.exe
  2. In case of error, use the same LogParser.exe file with a slightly different query which selects '0 as cs-bytes, 0 as sc-bytes'
Click here to see the code changes in GitHub repo.

The fix is not rocket science. It is an obvious thing everybody knows but unfortunately missed in the earlier phase. Thanks, Wade Mascia for pointing out.


Happy Analyzing...